About this website

Please use the menu bar above to read about me, services I provide, and happy voices, etc. What I made or mended in the past are showcased in the blog entries. I believe in making quality handmade items and upcycling/remaking previously loved fabric items as much as possible.

Saturday, August 31, 2024

Jacket

When it gets a little cooler, I want to wear som light jacket but I didn't have one. So, I made it. It's a simple jacket with a zippered closure in the front. 


I made it a bit longer so that it can cover a little more. It's perfect for a slightly cooler weather. The fabric is a 100 % cotton jersey. You may remember some hats I made with the same fabric. 

Friday, August 30, 2024

Wrist pocket pouch

A friend of mine sent me a link to a wrist pocket pouch that she saw somewhere on the internet. It sounded like she wanted it, so I made it from a sleeve I cut off from a merino-wool shirt. 

I made one that is tapered and one that is straight. In the colder months, you can just hide these under a sleeve of your shirt to carry only your essentials. 


Thursday, August 29, 2024

Sashiko

A while back, I tried to do some Sashiko needle work. I mostly sew on sewing machines just because I love the speed and how precise the stitches are. But sometimes, it is nice to sit down and do some hand stitching. It is like a form of meditation. 

This cotton fabric from Japan came with the pre-printed stitch lines so that a complete beginner like me can follow the stitch lines to make it look decent. It was fun and relaxing. 

I used a thread that has multiple shades of indigo blue. Now that I look back at it, I feel as though I should have used a solid blue colour. 


Wednesday, August 28, 2024

Rabbit pattern pouches

I really enjoy making pouches, bags, and such. Here are some made with a fabric my friend bought in Japan for me. It's such a cute fabric. 

A zippered pouch with a triangle case: 

A flat zippered pouch:

A fanny pack: 

Tuesday, August 27, 2024

Circular knitting needle holder

I needed a way to organize my circular needles, too, so I made a little book-like organizer for them. 

I used Cricut to make iron-on numbers so that I can identify the sizes of the needles. 

In storage, I tie the strings to close the book. 


Monday, August 26, 2024

Knitting needle holder

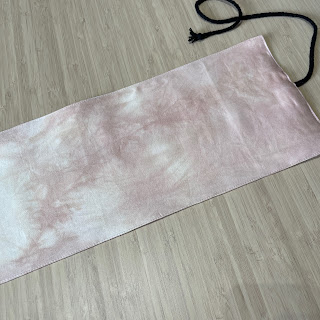
I needed a way to organize my double-pointed needles for knitting. So, I decided to make a roll case for them. Just like the brush roll I made before. This is how it looks when it's all rolled up. 

This is what it looks like unrolled. All my double-pointed needles are neatly resting. 

I dyed this fabric using some avocado pits. I quite like the light pink colour. I only dipped it once in the dye. But I think you want the colour to be deeper, you can repeatedly dip it in the dye. 


Sunday, August 25, 2024

Hats - yes more hats

I was requested to make more hats based on my friend's old hat

This time I was asked to put a little something in the front. So, here is a cat motif made with my Cricut Joy on an iron-on piece. 

Also, a motif of an anchor on a white hat. 

The wearer is enjoying these little playful iron-on decals. 

Saturday, August 24, 2024

Summer dress

This is a summer dress I made for myself. I had a tight bodice on this because I had made the dress a while back when I was a little slimmer. But the bodice was a little too fitting and the sleeves felt too hot. So, I wasn't wearing the dress very much. 

I had to remedy the situation! I took off the darts that were above the waist and iron them flat, and I took off the back zipper and sewed the back shut. Then, I took off the sleeves to make it sleeveless. Then, I put a placket in the front so it becomes a pull-over dress. 

Sometimes little alterations can make a big difference. Now this is my go-to dress on a hot summer day. 

Friday, August 23, 2024

Inner pockets

Following the 18th century split-side skirt, I thought I'd make a set of inner pockets for it. Since the sides are split int he split-side skirt, it's easy to stick your hands inside and locate these pockets inside. They can be pretty big, so they do hold a lot! 

As this page shows, they used to make such pretty inner pockets! If you search for the historical pockets, you will be amazed at how pretty they were. But I just wanted to try making some for myself, and I do not really care how pretty they looked, I just whipped up a quick set like the ones above. Again, I didn't like the idea of a knot in front of my belly, so I added two buttons and button holes. Initially I had only one button and button hole, but having two makes the whole thing sit well around my waist especially when I carry heavier things like my phone, a bunch of keys, and wallet, etc. I can carry quite a lot of things in them, and they are like a little purse! I think I should be able to use them for travelling as well since no one would dare put their hands in between my skirt sides. 

After I made these and used them for a while, I found that I had to be careful to find the opening to the pockets with my hands. Sometimes I would put my stuff in the split of the skirt and drop them, and it would just fall by my foot. It took me a little while to get used to be careful. 

Thursday, August 22, 2024

Split-side skirt

I saw all kinds of posts on social media of split-side skirts. They looked quite neat in that this idea goes back to the 18th century and that they are adjustable in terms of the waist circumference. I had a gathered skirt that I made a couple years ago, and I wanted to convert it to the side-split skirt. 

There's a lot of free online tutorials, but I also found this pattern (Cocquelicot Skirt)) by Wildflower Design, which is quite nice and explains the steps very clearly. 

This is the front view. 

The back view shows the tied bow. 

There's no zipper closure on this skirt. The back skirt fastens in the front like this - I chose a button and button hole closure in the front to reduce the bulk. Some other options are lace-up front with eyelets and string, or simply tie up the straps. I tried tying the straps, but I didn't like it because of the bulky knot being in front of my belly. 

With the front closure being a tie up closure, then it's easy to adjust the sizes. I figured if my waist size changed, then I can just move the button on the front. I in fact sewed on two buttons with an inch interval. Some days, I am a little larger in the waist and some days not. This has worked well for me. 

As you can see, I always change around things even though I buy a pattern. It's good to follow everything the pattern instructions tell you to do because we can all learn things that way. But once you have learned s a few things, you can start changing things around to fit what you like. 

Wednesday, August 21, 2024

Kitchen towels into placemats

Some of my places mats were getting old and worn. I had some kitchen towels, so I decided to cut them in half and hem them to make new places mats. 


This was such an easy remake, but it was fun. 

Tuesday, August 20, 2024

Window cover

My friend asked me to make a window covers using this beautiful Marimekko fabric! 


Marinekko is mostly known for the bright floral prints, but there are other beautiful prints as well. I really enjoyed sewing this set of window covers. There is something about sewing beautiful fabrics. 

They sticks to the window frame using hook-and-eye fasteners. They keep my friend's kitchen from getting over heated in the warm and hot months. 

Monday, August 19, 2024

Sleeveless top

This is a simple unbleached cotton summer top. 

I was too lazy to make a row of button holes and to sew on buttons. So, I decided to just install metal snaps. 

Oh no! I didn't reenforce the material on the button band or maybe I hammered in the snap too hard. So, there is a little cut around the snap... 

I had to repair this part by hand sewing. Lesson learned. 


Sunday, August 18, 2024

Waist band repair

The inside of the drawstring waist band was badly deteriorated. But the rest of the pants was in perfect shape. So, I was asked to do something to make it better again. 

The first step is to remove all the worn part of the waist band. (This is the part that takes a long time because I have to do this by hand with a seam ripper.)

Then, I prepare a new waist band to attach to the pants and just sew it on!  

 This process is the fast part. And it's all done. 

Sometimes people ask me why it takes a long time to "just cut off the bad parts and sew in a good part". If I simply cut off the bad part, then, the seam allowance will be cut off as well, and the fit of the pants will be different. So, in order to preserve the same shape, I have to take the original seams out and sew on a new waist band where the old one was. My contractor friend always tells me that the most important part is the preparation. This so applies to sewing as well. It takes time to prepare well to come up with a good result. 

Saturday, August 17, 2024

Thumb splint

Yesterday, I showed how I use a lot of clips to sew a laser curtain, and I think I damaged my thumb from that particular repetitive movement. This happened a couple of years ago. I went to my doctor first and she referred me to a hand therapist who specialized in treating this kind of case. It got better in several month.

During the time I was healing, I had to wear a thumb splint. The thumb splint I bought at a store was too big for my hand. More precisely, I think my thumb was too short for the width of my hand. The thumb splint wrapped around my hand just fine, but the thumb got away from the restraint. 

So, I had to make myself a couple of thumb splint that fit my hand and thumb. The bonus is that I could use some remnant fabrics I liked. They are 100 % cotton, too, so they felt comfortable, too. (I am not fond of the feeling of polyester and nylons... The part that wrapped around the thumb was made of nylon webbing, but I had a layer of cotton under it.


Yup, these clips below... Who knew that they can cause such inflammation in my thumb joints? 


Friday, August 16, 2024

Sometimes industrial

Sometimes I sew things on the industrial sewing machine. Using the industrial sewing machine is so fun because it's so powerful and the stitches are very precise. 

But often I have to deal with large pieces of fabric. Below is a video of me cutting the huge fabric. 

The picture below shows how I use the clips to sew the corner of the laser curtain with a bias tape. Because this fabric is coated, if I use a pin, it leaves a hole. Also, the fabric is too thick for a pin anyways. 

Often, I have to use multiple clips like this because the fabric shifts so much, and I want to prevent it. 


Thursday, August 15, 2024

Valencia flouncy skirt

I am very happy to share the Valencia Flouncy Skirt I made last month. This pattern is by an indie pattern designer Sew Into That (Anaïs). 

I was lucky to have been able to test the pattern, and here's the photo of the front view. 

Side view:

Back view:

I usually do not wear feminine kind of skirt, but I like this one. Maybe because I love Valencia - such a charming city near a town where my good friends live. 

The fabric is a Japanese fabric called "chirimen" (this one is made of polyester, although one can find silk chirimen as well.) Chirimen has a crinkle texture, so even though this is made of polyester, I don't feel like it sticks to my skin very much. 

The sewing instructions were well written and easy to follow, and I liked the sewing tips the designer provided. 

The flounce was technically a bit challenging using a rolled hem pressor foot on my sewing machine because this polyester fabric frayed a bit easily and the curves at some points were pretty sharp. I should have just used the rolled hem function on my serger. A lesson learned. I will utilize my serger more in the future. 

Please check out this page for this pattern to sew the skirt yourself, or you can always hire me to make this skirt for you. 

Wednesday, August 14, 2024

Zipper issue on a boot

I bought a pair of winter boots a few years ago at a locally owned shoe store. When I wore them, the left side zipper pull kept on coming down and opening. I looked at the receipt and it said no refund after having worn the shoes outside. So, I thought there was nothing I could do about returning or exchanging the defective pair for a new pair. 

After thinking about it, I thought about just adding a zipper stopper so the zipper pull doesn't fall down. I sewed on a little tab and installed metal snaps. I know this does not look all that fashionable, but this part of the boot is always hidden under my pant leg anyways, so I did it. It works well. (After a while, I went back to the shoe store where I got those boots, and I told them about the problematic zipper. The store clerk told me that with defective shoes/boots, I could have brought them back and they might have been able to do something about it. Now I know. Oh well.) 

Tuesday, August 13, 2024

Linen hats

More bucket hats! The top one and the bottom one are different hats, but they look the same because I used the same linen fabric from IKEA that's supposed to be used for a curtain. The top one is reversible with one side natural linen colour and the other side grey. But they are so similar in colours, I can't really tell the difference much. 

For the second hat, I made a little pocket on the side as a decoration. It is a functional pocket, but I guess it is rather small. 

I again used a free PDF pattern from Glory Allan. (I like his pattern.) If you want to try making your own hat, I think his pattern is probably one of the best ways to get into making hats. 

Monday, August 12, 2024

Ainu embroidery

Sometimes, I like to try stitching some things by hand. It is a very relaxing time, and I like it. This motif is by Ainu people, an indigenous people in northern Japan and other parts of Russia. 

I grew up in Hokkaido, and I would see Ainu art like embroidery, appliquéd clothing, and curved wood figurines. They are all beautiful. 

I wanted to try putting this motif on a mask I made for my friend during the COVID time. It still looks rudimentary, but if I practiced more, maybe I can get better at it. 

Sunday, August 11, 2024

Raglan dress

This is my favourite pattern. It used to be just a raglan shirt pattern with some split design in the front, but I simplified it and lengthened it to make it a dress pattern. 

It is such a comfortable dress and is perfect for relaxing. (Well, I dislike uncomfortable clothes, so I'd wear this any time.)

Saturday, August 10, 2024

Custom sewing for hard-to-find items

Have you been looking for a certain item but can't find it because it's discontinued or has specific features? Contact me to have something made for you. You can also read this page to find out how custom sewing works.

Apparently, it was hard to find fitted sheets for a 4Moms Breeze (model No. 1028). As a result, I got to make them with such pretty fabrics!

The great thing about custom sewing is that you get to choose the fabric! It is fun browsing all the beautiful fabrics in a fabric store and find what you like for your baby's room.

This particular mattress has six bands that have Velcro (to secure the mattress onto the base). This means I made six holes for those bands to go through. It always helps to have the actual mattress for which this piece is intended.

Of course, if you would like to make it yourself, I can always walk you through the process in my sewing lessons as well. You can bring your own sewing machine or you can use one of mine in the studio. Please contact me to discuss the possibilities. 

Friday, August 9, 2024

Pin cushions

My woodworker neighbour across the street made me the beautiful bases for my new pin cushions. I added the cushy parts to complete the pin cushions. 

I love the way they turned out. I used vintage wool Kimono fabric remnants for these pin cushions. 

The photo below shows how the wooden bases look before I added the cushion parts. Those are such pretty wooden bowls! If I had a wood workshop space and all the tools, I would be making lots of wooden things, too. But before I do that, I should really finish using up my fabric stash. 

Thursday, August 8, 2024

Hat with a wide brim

I made a wide brimmed hat a little while ago. I wanted something that really shades my face area when I am outside, especially when I go to a farmers market because it's often outside. 

This is one side, and the fabric is called farmers market, so I thought it was cute to use it on one side. It is a 100 % cotton quilting fabric. 

The other side is a linen and cotton blend fabric which was an end of the roll remnant that the store cut into about a size of a fat quarter to sell off. The fabric size was just right to make this hat. I like a reversible hat. It feels like I have two hats while I actually only have one. 

 As both cotton and linen shrink when you wash it, so I prewashed it. However, even after the second wash, it shrunk a tiny bit, and now it is a very snug hat that will not blow off even by a moderate-strength wind.